Interferometers
SPI Interferometers
Our SPI systems check the flatness of non-reflective or reflective surfaces.
- Accurate
- Cost Effective
- Easy to Read
- Compact
Lapmaster Wolters International’s SPI Interferometers with grazing incidence are a inexpensive, fast and accurate means for flatness inspection of ground, fine-ground, lapped or polished parts. The flatness reading of a non-reflective ground surfaces (most materials) are clearly displayed as fringe-pattern topography on an accompanying monitor. Eliminate the need for secondary polishing operations when the only purpose is to generate a reflective finish for optical flatness measurement. Whether used directly next to the lapping, fine-grinding, grinding machine or inspection lab, the Lapmaster Wolters SPI interferometer is a cost-effective solution for simple flatness qualification requirements. An optional printer provides documentation of the flatness readings. This instrument is an excellent platform for both qualitative (go/no-go) as well as quantitative flatness measurements.
TOPOS Interferometers

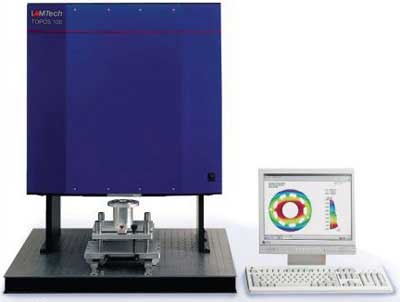
This instruments features non-contact flatness measurement of precision-manufacturing surfaces with sub-micron accuracy. They meet the requirements for objective working measurement tools for the production and quality control of sophisticated components, utilized in fuel injection systems, pumps or valves.
Our measurement principle is based on interferometry with grazing incidence of light. This set-up allows for flatness measurements of polished as well as non-reflective, rougher surfaces, which would not be measurable with traditional interferometers for flatness testing. An air gap between prism and part ensures maximum possible protection against mechanical damage and facilitates simple handling.
The sensitivity can be selected from four calibrated settings. Upon manufacturer’s delivery, 0.5, 1, 2, and 4 microns/fringe are provided by default. This wide range allows for optimal setting of the measurement system to the specific properties of the test part. In this way, surfaces of ultra-high precision such as polished mechanical seals can be measured with the highest sensitivity (0.5 um per fringe), while the lower sensitivity levels allow the measurement of rougher, uneven or highly worn-out surfaces, as well. Typical areas of application for TOPOS are the flatness measurement of lapped, flat-hones and fine-ground precision parts, valve plates, sealing and control discs, mechanical seals made of ceramics (AI2O3, SiC, SiN), metal (steel, aluminum, bronze), carbon or synthetics (duroplast, thermoplast, PMMA).
The computer based evaluation provides for three-dimensional, fast and objective parts testing. According to the principle of dynamic fringe evaluation, several phase-shifted fringe images are acquired with the built in CCD camera, from which the form is then determined. During the measurement, the acquisition of the fringe images takes approximately 1.2 seconds, and the computation of the form takes about one to three seconds for up to 300.000 data points. The measurement area to be evaluated can be found automatically by the program or, alternatively, be user-determined by selecting from a number of basic geometrical shapes (circle, ellipse, ring or rectangle). Position and size can be set easily with the help of a border line which is overlaid to the image of the part. A border exclusion can be set separately for the external and the internal contour.
For continually repetitive sequences of functions (such as measurement, tilt subtraction, border exclusion, median filtering, display of false-color image and 3-D graphics), a macro for an automated measurement procedure can be generated and saved on the computer. Furthermore, all parameters chosen for an individual measurement during the measurement procedure are saved, which facilitates relating a measurement to a product and hence allows for rapid switches between different parts.
Measurement can be saved, evaluated and printed out at a later time. Data export to statistics and quality control programs is established by saving the series of the measurement results either in a CSV data format, in qs-STAT data format or via the serial interface.
Due to the non-contact feature and fast measurement, TOPOS Interferometers can be used in the automated quality inspection of production parts. As an example, during the 100% control of mechanical seals, more than 1200 parts per hour are measured during 3-shift operation.
For the documentation of the part’s flatness, several graphical options are available: false-color image, 3-D image, cross section graphs with the four main cross sections, measurement protocol with the 3-D image and the section graphs, developed views for rings, and relief representation. Every graph displays the user-selectable legend and the measurement parameters. In the production facility, TOPOS Interferometers are installed directly next to the tooling machines. This ensures short distances and fast monitoring of product quality. In case of special production environments, the interferometers can be encapsulate specifically with regard to dust and oil-containing air.
TOPOS Interferometers are available as models with either 50mm or 100mm measurement area. For the exclusive measurement of small parts, a special TOPOS 50 -20 with 20mm measuring area is manufactured. The TOPOS 100 model offers an optional zoom lens for an even larger operational range. Large rings, of 250mm diameter for example, can be measured automatically with a TOPOS 100 featuring a supplementary rotating measurement table. This offers the advantage of high spatial resolution measurements of the individual ring segments and furthermore, represents an economically attractive alternative to a measurement device with a measurement area of the actual size of the maximum ring diameter.


